Indirect Laryngoscopy Diagram - How to Draw and Label
💎 Buy my Premium ENT Notes
Instant access to 200+ high-yield ENT notes. Your purchase includes all future updates.
🇮🇳 For Indian Students
· To buy all my notes, click here🌎 For International Students
· Buy the note for this lecture· Buy Complete Notes on Anatomy of Larynx· Buy all my notes in ENT💡 This post is a free outline of my YouTube video. Get my full handwritten notes using the links above.
How to Draw and Label an Indirect Laryngoscopy Diagram
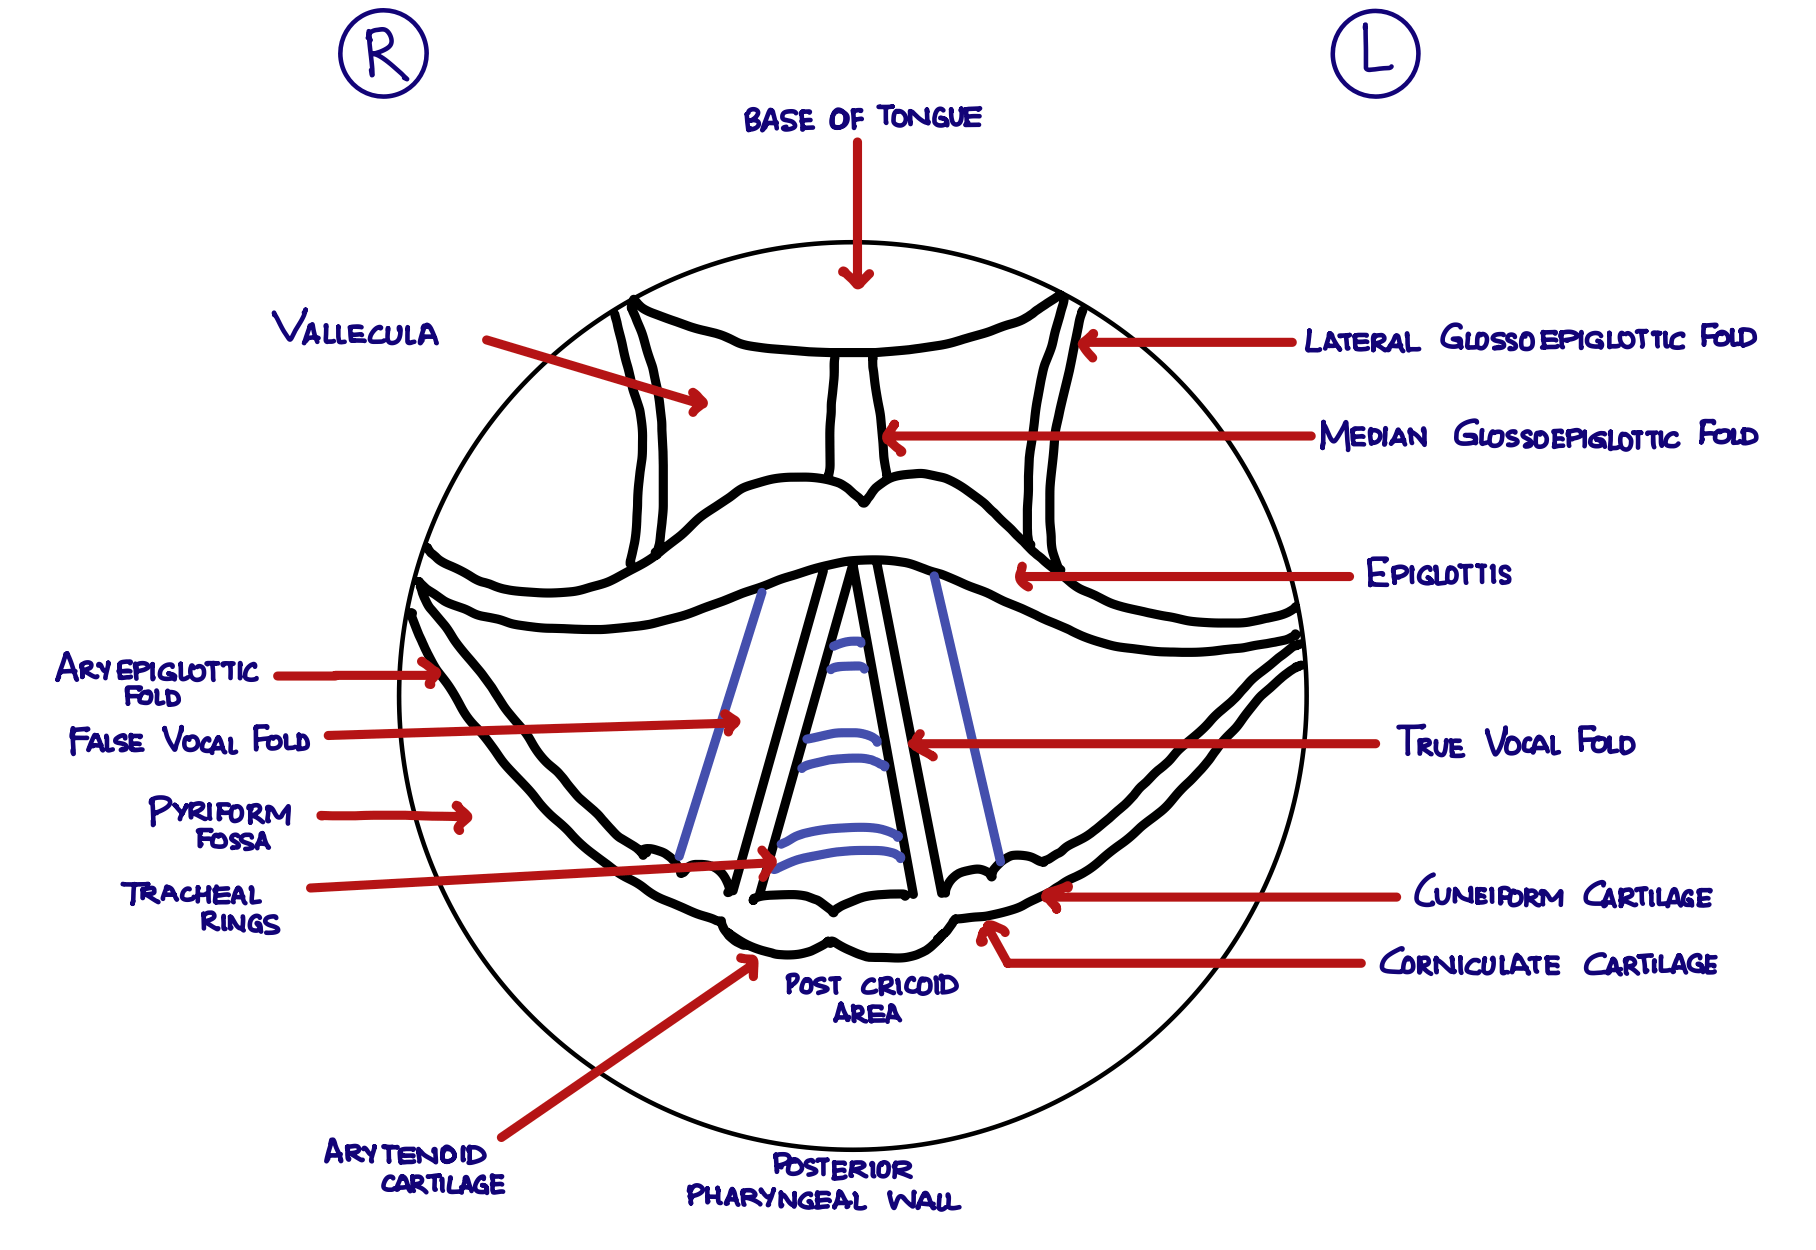
In this post, you'll learn how to draw an indirect laryngoscopy diagram—step by step—and label all the structures that are visible through the mirror. This is a key practical skill for ENT students and residents.
🎯 Pro Tip: The view you draw should reflect what is seen via the laryngeal mirror, which is circular and shows a mirror image—the patient’s left appears on your right.
Step-by-Step Drawing Instructions
-
Start with a Circle - Since the laryngoscope view is seen via a round mirror, draw a circular outline to begin.
-
Base of the Tongue - The first structure you’ll see is the base of the tongue, located in the upper part of the mirror view.
-
Draw the epiglottis next - shape it like an upper lip structure.
-
Glossoepiglottic Folds - Draw the folds connecting the tongue to the epiglottis:
- Median glossoepiglottic fold (in the center)
- Lateral glossoepiglottic folds (on each side)
-
Valleculae - The spaces between the median and lateral glossoepiglottic folds are the valleculae (right and left).
-
Now, draw the True vocal cords in the lower central part of the diagram.
- Anterior commissure is the point where the two cords meet in the front.
-
Arytenoid Cartilages & Interarytenoid Area - Posterior to the cords:
- Draw two arytenoid cartilages.
- The space between them is the interarytenoid region.
-
Aryepiglottic Folds (AE Folds) - Connect the arytenoids to the epiglottis with the aryepiglottic folds.
-
Corniculate and Cuneiform Cartilages - Located in the posterior part of the AE folds:
- Draw small nodules for corniculate and cuneiform cartilages.
-
Pyriform Fossae - On each side of the AE folds, draw the pyriform sinuses or pyriform fossae.
-
False Vocal Cords - Just above the true cords, draw the false vocal cords (vestibular folds).
-
Tracheal Rings - Below the cords, add the tracheal rings as semicircles.
-
Postcricoid Area & Posterior Pharyngeal Wall
- Draw the postcricoid region just behind the trachea.
- Behind that lies the posterior pharyngeal wall.
Labeling the Diagram
When labeling, always remember:
The patient's left appears on your right side.
Always draw accordingly.
Structures to Label:
- Base of the tongue
- Epiglottis
- Median glossoepiglottic fold
- Lateral glossoepiglottic folds (right and left)
- Valleculae (right and left)
- True vocal cords
- Anterior commissure
- False vocal cords (vestibular folds)
- Arytenoid cartilages
- Interarytenoid area
- Aryepiglottic folds
- Corniculate and cuneiform cartilages
- Pyriform fossae (right and left)
- Tracheal rings
- Postcricoid area
- Posterior pharyngeal wall
Clinical Tip: Vocal Cord Mobility
- To show normal mobility, draw bidirectional arrows on both cords.
- In vocal cord palsy, do not draw arrows. Instead, show a cut mark (slash) across the affected cord.
📝 All topics and questions from this post are explained in detail in my Premium ENT Notes, which are designed for clinical understanding and exam success.
Residency is hard enough. Studying for it shouldn't be 😊
💎 Buy my Premium ENT Notes
Instant access to 200+ high-yield ENT notes. Your purchase includes all future updates.
🇮🇳 For Indian Students
· To buy all my notes, click here🌎 For International Students
· Buy the note for this lecture· Buy Complete Notes on Anatomy of Larynx· Buy all my notes in ENT